Introduction
Starting with Visual Studio 2012, Microsoft introduced VS Test. VS Test, unlike MS Test in earlier versions of Visual Studio, allows you to write unit tests against pure native C++ code without compiling the unit test projects with /clr. Supports for pure native C++ unit tests continues with Visual Studio 2013.
VS Test integrates with Visual Studio Test Explorer which lets you run, debug, and view your unit test results without ever leaving Visual Studio.
Getting Started
To create a new unit test project to test a pure native C++ project
- Right-click on the VS solution, select “Create new project”.
- Then select “Native Unit Test Project” as shown.

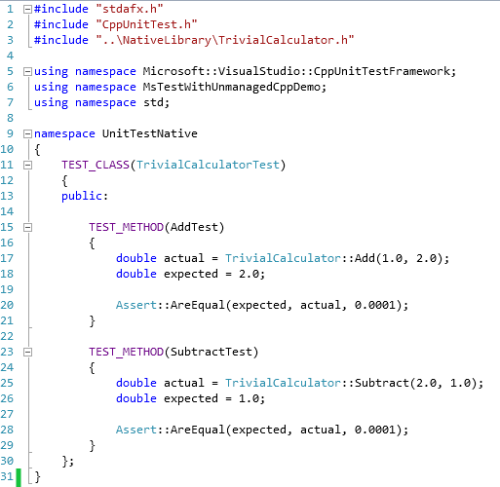
The Visual Studio template creates a unit test project that is configured for testing native C++ code. With a little modification, you can customize it to test your code. Following is an example of such a test class:
When you build and run the unit tests in Visual Studio, this is what you’ll see under Test Explorer:

The assert library is very rich. It includes just about everything that is supported with any typical unit testing framework. For a complete documentation on supported assert statements, see MSDN Documentation for CppUnitTestAssert header.
Additional macros that you may want to use in your tests can be found here:
- http://msdn.microsoft.com/en-us/library/vstudio/hh694604.aspx#BKMK_Initialize_and_cleanup
- http://msdn.microsoft.com/en-us/library/vstudio/hh694604.aspx#BKMK_Create_test_attributes
Nuances of writing native C++ unit tests using VS Test
Like native C++, VS Test is imperfect. Even under Visual Studio 2013, it doesn’t play well with CLR. If you have a purely native C++ library under test that directly or indirectly references another C++ library compiled with /clr, VS Test won’t be able to discover your unit tests. That is, your unit tests would mysteriously not show up in Test Explorer. No explanation offered by the IDE. In the event of missing runt-time dependencies, Visual Studio will also unable to discover your unit tests.
Another annoying thing with VS Test is that the unit test’s platform has to be explicitly specified in Visual Studio (both 2012 and 2013). By default x86 is selected. If your code targets x64 platform, you’ll have to change the Test Default Processor Architecture to x64. Otherwise, your unit tests will not be listed under Test Explorer and it won’t tell you why.
To change VS Test’s Default Processor Architecture,

Sample Code
<<Click here to download full sample code>>
I put together a little VS Test sample code in Visual Studio 2013. The sample code contains three Visual Studio projects.

The UnitTests.Managed project and the UnmanagedLibrary project are recycled from a previous blog post Native C++ Unit Testing with MS Test, which was written prior to Visual Studio 2012 introduction of VS Test.
For this blog entry, I added UnitTest.Native. This new addition is the equivalent of UnitTests.Managed project that is created from a C++ => Native Unit Test template. It is purely native C++ and doesn’t compile under CLR.

Hi
Have you run into the problem of the error message “Failed to set up the execution context to run the test” before?
I got this message when all tests that were running fine in 64-bit Win7 all failed when I put it on a machine running 32-bit Win7.
My project under test is a native c static lib.
Hi AK,
Are your tests build in 64-bit? If they are, you can’t run them on a 32-bit system.
Ngan
Hi, I have native test project and I need to run the unit tests on a remote test agent machine. Even the remote test setting is selected, VSTest run the locally.
It works with managed test projects. Do you know a work around, trick or anything that allow the native tests to run remotely? I work with VS2012 and VS2013.
Thanks & Regards,
Sabrina